- 1. Install the VeRoViz Python Package
- 2. Install Cesium and the VeRoViz Cesium Viewer
- 3. Register for API Keys
- 4. Setting up Environment Variables
- 5. Openrouteservice (ORS) Installation
- 6. pgRouting Installation
Getting Started
VeRoViz is a suite of tools consisting of the following components:
- The
verovizPython package;- You will need a working version of Python installed on your computer.
- The VeRoViz Cesium Viewer plugin;
- You will need to install the Cesium application on your computer.
- An online utility, named Sketch, for "manually" drawing elements of a vehicle routing problem.
- There's nothing to install to use Sketch; simply visit https://veroviz.org/sketch.html.
The instructions below will guide you through the installation process for the Python package and the Cesium plugin.

These instructions assume that you already have Python installed. Here are some links to help you install Python (if you have not done so already):
- https://wiki.python.org/moin/BeginnersGuide/Download
- https://realpython.com/installing-python
- https://docs.python-guide.org/starting/installation
- https://docs.microsoft.com/en-us/windows/python/beginners
- https://www.anaconda.com
As you can see, there are many options. You'll need to do some investigating to determine which approach is best for your needs.
We also recommend that you run VeRoViz from a Jupyter notebook. Installation instructions can be found here:
Installation Instructions
1. Install the VeRoViz Python Package
We recommend installing VeRoViz within a "virtual environment". There are many ways to configure virtual environments, some of which depend on your Python distribution and/or operating system. Here are some general links to help you decide if virtual environments are right for you:
VeRoViz is available on the Python Package Index (PyPI). This link may be helpful if you're unfamiliar with "pip":
VeRoViz may be installed via pip as follows:
pip install verovizTo test your installation, use the following Python commands:
import veroviz as vrv
vrv.checkVersion()
If the installation was successful, you should receive a message indicating that "you are up-to-date with the latest available version".
If you have previously installed VeRoViz and need to upgrade to the latest version, use the following terminal command:
pip install --upgrade veroviz2. Install Cesium and the VeRoViz Cesium Viewer
This step is optional, but recommended. The VeRoViz Python package can automatically generate dynamic 3D visualizations using Cesium, an open-source JavaScript library for rendering 3D maps.
If you don't install Cesium, you can still generate static 2D Leaflet maps. However, 3D time-dynamic maps are much more exciting!
Install the Cesium Application
The following instructions are adapted from https://cesiumjs.org/downloads
- Download the latest release of CesiumJS from https://cesiumjs.org/downloads.
- Extract (unzip) the .zip archive. Make note of where you save it.
- Install the LTS version of node.js, from https://nodejs.org/en/download/.
- From a command/terminal window, navigate to the main "cesium" directory (see your notes from Step 2). Then, issue the following command:
npm install
Test Your Cesium Installation
- From a command/terminal window, navigate to the main "cesium" directory (as in Step 4, above).
- Start the node.js web server:
node server.cjs - Open a web browser and visit http://localhost:8080/Apps/HelloWorld.html. You should see the Cesium Hello World app.
Add the VeRoViz Cesium Viewer Plugin
The VeRoViz Cesium Viewer is a local website that is configured to display output from the VeRoViz Python package in Cesium.
- Download the VeRoViz Cesium Viewer from https://veroviz.org/downloads/veroviz_cesium_viewer.zip.
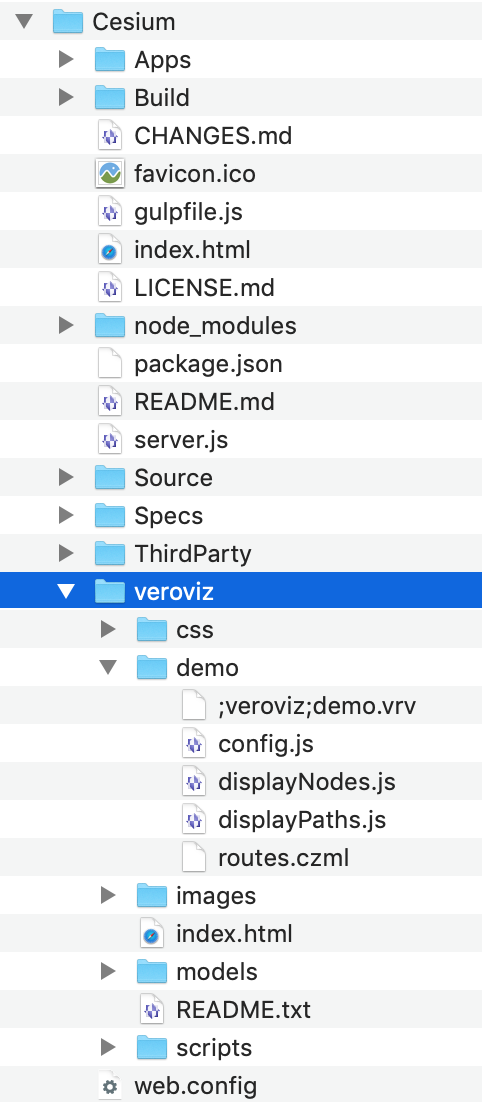
- Extract (unzip) the .zip archive. It contains a directory named "veroviz". This directory should be moved into the main "cesium" directory. The result should look like this:
Test the VeRoViz Cesium Viewer
- From a command/terminal window, navigate to the main "cesium" directory. Start the node.js web server (if it's not already running):
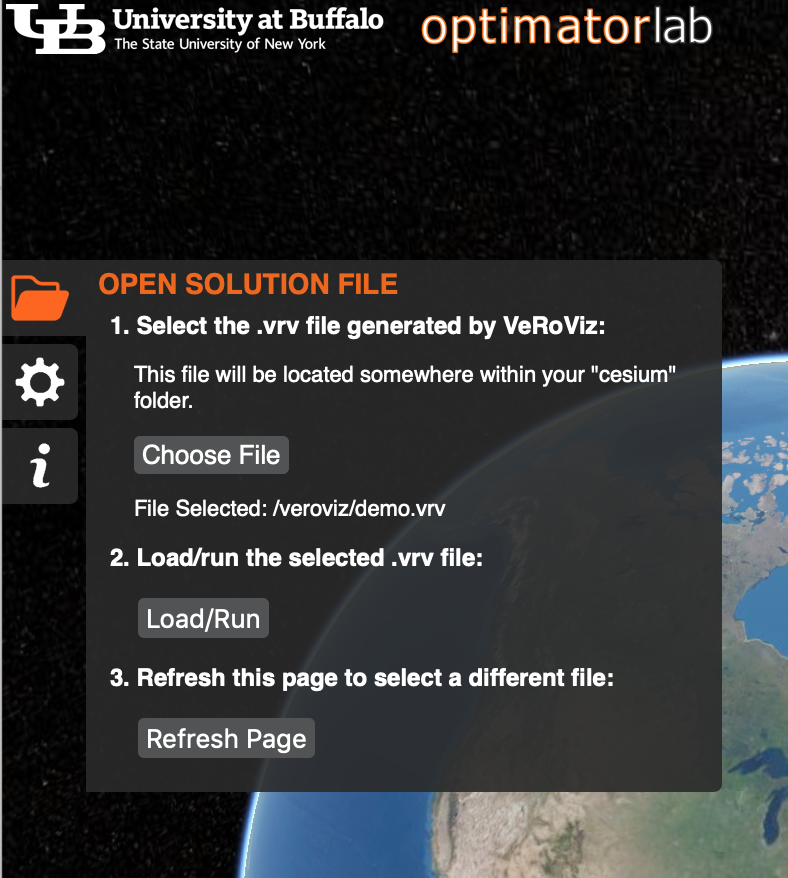
node server.cjs - Open a web browser and visit the VeRoViz Cesium plugin page: http://localhost:8080/veroviz.
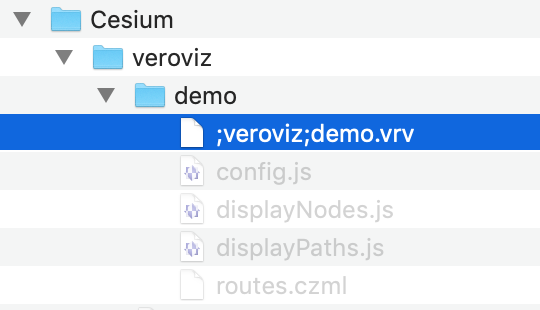
- Click the folder icon on the left side of the page. Then, click the "Choose File" button. Navigate to the "Cesium/veroviz/demo" directory and choose ";veroviz;demo.vrv". Finally, click "Load/Run" to run the demo.
3. Register for API Keys
This step is optional, but is highly recommended if you want access to reliable/realistic routing data.
VeRoViz currently supports integration with the following data providers. You might choose to use only a subset of these.
MapQuest
MapQuest is a commercial data source, but users may issue a limited number of requests for free. You may apply for a MapQuest API key here: https://developer.mapquest.com/documentation.
MapQuest provides perhaps the most detailed results of the data providers. However, keep in mind that the free API key has a monthly limit on the number of queries.
OpenRouteService (ORS)
ORS is currently the suggested data provider for VeRoViz. Like OSRM, it uses data from OpenStreetMaps. ORS offers a free API key with a generous daily query limit. ORS also provides an open-source engine that can be installed locally, which VeRoViz now supports (as of version 0.4.0, in April, 2020).
Register for a free ORS API key here: https://openrouteservice.org/dev/#/signup.
Open Source Routing Machine (OSRM)
OSRM is available via both an online API (in which case no installation is required) or as a local installation. Currently, however, VeRoViz only supports the online API.
For the online API, no API key is required. Please note, though, that this API is hosted on a "demo" server, which is not intended for high-volume user requests. It is recommended that users use OSRM only for small-scale testing/evaluation; please don't overload the OSRM demo server with large-scale problems. Be advised that excessive OSRM requests will often result in server timeouts.
The routes and travel matrix data provided by OSRM are based on OpenStreetMaps. OSRM's results are typically less detailed than those provided by MapQuest.
Open Weather Map (OWM)
OWM provides current, forecast, and historical weather data, as well as map overlays for Leaflet. Support for OWM integration is available in VeRoViz version 0.4.0.
You may register for a free API key at https://openweathermap.org/api.
Elevation-API
Elevation-API provides elevation data for practically any location on the globe. Elevations at 5km resolutions are available for free; higher-resolution data may be obtained for a nominal fee. Support for Elevation-API integration is available in VeRoViz version 0.4.0.
You may register for a free API key at https://elevation-api.io.
4. Setting up Environment Variables
This step is optional.
System environment variables allow you to save frequently-used information (such as API keys or paths to your Cesium installation directory). By saving these as environment variables, you don't need to copy/paste these values into each new Python script. Additionally, referencing API keys through environment variables makes it easy to share code with others without having to remove your private information.
The following environment variables are suggested, and are used throughout the VeRoViz documentation. We follow the convention of using ALL CAPS for these variables:
MAPQUESTKEY- Your API key for MapQuest.ORSKEY- Your API key for OpenRouteService.CESIUMDIR- The full path to your "Cesium" installation directory.ELEVAPIKEY- Your API key for Elevation-API.OPENWEATHERKEY- Your API key for OpenWeatherMap.
Instructions Vary by Operating System
Mac
- Open your
.profilefile for editing. Since this is a hidden file, editing through a terminal window is probably the easiest approach:pico ~/.profile - Include the following lines at the bottom of your
.profilefile, replacing the text in quotes with appropriate values (but keeping the quotes):export MAPQUESTKEY="yourkeygoeshere" export ORSKEY="yourkeygoeshere" export CESIUMDIR="/path/to/Cesium" export ELEVAPIKEY="yourkeygoeshere" export OPENWEATHERKEY="yourkeygoeshere" - After saving the file, tell the operating system to reload it:
source ~/.profile
Linux
- Same as Mac instructions, but replace "~/.profile" with "~/.bashrc".
Windows 10
- Select "System" from the "Control Panel".
- Select "Advanced System Settings" and click "Environment Variables".
- Choose "New System Variable", and provide both the name (e.g., "CESIUMDIR") and value (e.g., "C:/path/to/Cesium") of this new environment variable.
- You might need to reboot your system for the changes to take effect.
Reading Environment Variables in Python
In your python scripts (or Jupyter notebooks), you may read the environment variables as follows:
import os
MAPQUEST_KEY = os.environ['MAPQUESTKEY']
ORS_KEY      = os.environ['ORSKEY']
CESIUM_DIR   = os.environ['CESIUMDIR']
OWM_KEY      = os.environ['OPENWEATHERKEY']
ELEVAPI_KEY  = os.environ['ELEVAPIKEY']
5. Openrouteservice (ORS) Installation
This step is optional, but can be beneficial if you require significant volumes of routing data (beyond what is typically supported by the free APIs referenced above).
Openrouteservice has online APIs for calculating travel directions, time/distance matrices, elevation, geocoding, and isochrones. You may also install their routing machine locally via docker. A local installation of ORS removes the data limits associated with online API keys, but will also require you to maintain the routing engine (and map data) on your machine.
6. pgRouting Installation
This step is optional, but can be beneficial if you require significant volumes of routing data (beyond what is typically supported by the free APIs referenced above).
pgRouting is an open-source database application that must be installed locally on the user's computer. You will need to install pgRouting before using related functions.
We recommend that users update their local pgRouting database frequently, as the source data (from OpenStreetMap) changes over time.
If you find odd results when using pgRouting, (e.g. unexpected travel times of "0") or if nodes are not being snapped properly to roads, please check if the data in the pgRouting database is sufficient to cover the region of interest. VeRoViz can not calculate the coordinates outside the boundary of pgRouting data.
Next Steps
Now that you've installed the VeRoViz components, it's time to test it out. Here are some links to get you going:
- Examples - A growing collection of sample code is provided to help get you up-and-running faster.
- Detailed Function Reference Guide - Each VeRoViz function is fully documented, along with information on data providers, Leaflet/Cesium configuration options, and dataframe structures. Examples are also typically provided.

© 2018-2025 optimatorlab
© 2018-2025 optimatorlab